|
File Menu (Continued) Making Video Movies
Make Movie Files
The Make Movie File is in the Creator Plus and Creator
Pro upgrades. To be sure you have one of these versions look in
the lower right hand corner of the screen. It will say Video
Plus or Video Pro depending which versions you are working with.
Upgrades are available for purchase. If neither video option has been
purchased then this corner of the screen will not contain any text.

Make Movie Clicking on
Make Movie File selection under the File Menu initiates
the creation and saving of an AVI movie file. The Plus and Pro
products operate exactly alike. The difference is in the out put
resolutions that the Pro version can manage.
The Plus version is limited to 399 vertical lines this
is more than enough for any Internet application. The pro version
provides files of resolution suitable for professional video
applications.
AVI files are created to be compatible with CODEC
files that must be resident on the viewers’ machine. There are
dozens of different CODECs in use and every PC comes with a variety
of them. ISMC will run with any Windows compatible CODEC. CODECs
are available from a variety of sources. The Resource area of the
ImageMatics site provides links to online sources for them.
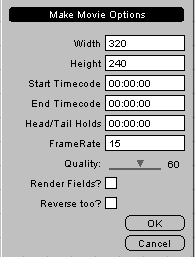
The dialog box that appears under Create Movie is
shown. Some of the features offered here will only be of interest to
those familiar with video editing and video applications.
Width The width of the
movie in pixels
Height The height of the
movie in pixels
Start Time Code The
embedded time code start (first frame) of the video. The default is
oo:oo:oo which is zero minutes, zero seconds and zero frames.
Standard editing packages will be able to read the embedded time code
and can modify it during the editing process. Setting the Start Time
Code to any thing but zero will cut off the frames prior to that
code.
End Time Code. The
End Time Code is initially calculated by the length of the Movie
and is set in place when the dialog box is called up.. Lowering the
value cuts off the end of the Movie at the specified frame. Using
End and Start Time Code together crops
the video being created.
Head / Tail Holds
The Head/ Tail Holds provides a “leader” and a “tail” on the
video of the length specified. The leader will be the first frame
repeated and the tail the last frame. This feature is used to
provide some extra “width” in the video sequence if it is going to be
“insert edited” into another video. It lets you match up the gap you
are inserting into exactly.
Frame Rate. The Frame
Rate specifies the number of frames per second to be
rendered. For video applications this must be set at 29.97, which is
the analog video standard. For Internet applications frame rates of
10 – 15 frames per second can give good results. Note: The
more frames per second the bigger the file and the more bandwidth
required.
Quality The Quality
value is passed to the CODEC, which will actually create the AVI
file. The higher the value, the better quality the video will be and
the larger the file size and bandwidth required. The specific CODEC
and the content of the movie will determine the Quality
factor that gives best results at a reasonable bandwidth and file
size. Experimentation and experience are the best guidelines here.
Render Field? The
Render Field? check box determines if the video will be
interlaced or not. Check it the video is to be used in analog (video
tape etc) applications leave unchecked for Internet applications.
Reverse Too The
Reverse Too will generate a forward and then backwards playing
version of the video. This is so a zoom-in and zoom-out can be
exactly matched for an analog video application. This function
is oriented toward those who come from a video production background.
The effect is easily duplicated within ISMC.
Batch Render Movies
Batch Render Movies lets you select multiple
Movies (MPX files) to be rendered into AVI files. Selecting the
function provides a standard FIle Dialog Box. Multiple files
may then be selected to be rendered in a batch process.
Depending on the number and sizes of the files this process can take
some time. Scheduling the Batch run over lunch is not a bad idea.
After the files to be rendered (converted to AVI) are selected the
Make Movie Opinions dialog described on this page is then
displayed. All the files selected will be rendered according to these
settings.
CONTINUED
[ File
| Edit |
Options | View |
Help ]
|