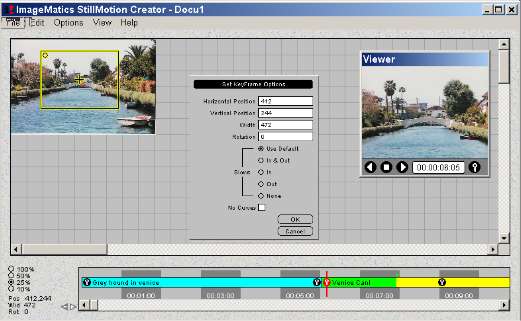
The KeyFrame Control Dialog
Each KeyFrame Marker contains all the information
required to define the motion sequence between its adjacent KeyFrame
Markers.
Placing the cursor over a KeyFrame Marker and then right clicking
brigs up the KeyFrame Options Dialog Box. Figure 8 shows the KeyFrame
Dialog Box associated with the KeyFrame pointed to by the arrow..
This dialog box contains all the control access necessary to manage
the motion sequence. All the parameters that are exposed I this
dialog box can be controlled from the main menu system or from other
places. The KeyFrame Dialog Box provides the experienced user with a
centrally located resource that provides quick and complete control
over the movies behaviors.
 Figure
8. Key Frame Control Dialog Box
 The
dialog shows the current values and provides for them to be manually
changed.
The Horizontal and Vertical Position fields provide the location of
the upper left hand corner of the Camera Window. The Width field
provides the width of the Camera Window. The height is automatically
set as the aspect ratio is fixed for the entire movie. The aspect
ratio may be changed under the Options menu.
The Rotation Angle is provided in the next field and may be modified.
The motion attributes can be controlled by the selection of
attributes on of Slows. Slows refers to the acceleration of the image
motion as it starts and stops. Slow In starts from still and speeds
up to a constant speed. Slow Out refers to the speed slowing at the
end of a motion sequence. The KeyFrame markers define the motion
sequences start and ends.
No Slows provides constant speed throughout the motion sequence.
The No Curves selection will cause the path between KeyFrames to move
in straight lines. The default uses curves that are generated between
two or more KeyFrames.
If there are only two KeyFrames this control will have no effect.