Preloader
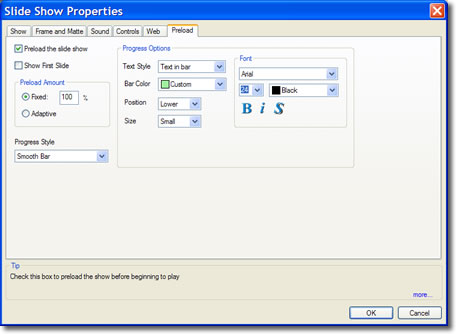
The Slide Show Properties Preload Tab (shown below) enables, adds and configures a pre loader to the Flash published from the current slide show being edited.

Preload tab
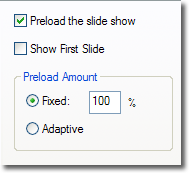
Checking the Preload the slide show box as shown above will enable the selection of the Preload tab's tools. When this box is checked a preloader will be added to the Flash file published from the current show.
 A preloader is code that that is added to a Flash (SWF) file that causes the Flash Player to load a specified percentage of your published slide show Flash file prior to beginning playback. The purpose of the preloader is to ensure smooth playback of larger SWFs for users on slower connections. In this way, users on slower speed connections such as dial up modems can view larger, higher quality Flash shows without buffering or the movie action stopping and starting. A properly preloaded Flash file will play smoothly throughout its entire presentation.
Selecting the Fixed button lets you choose the percentage of the SWF file to be "preloaded" prior to the beginning of play.
The higher the percentage the more of the SWF is loaded and the longer the viewer waits for the show to begin. This may serve a practical purpose besides annoyance. Checking the Show first slide box will display the preloader with the first slide as a title page in the background. The title page, we need not actually be displayed in the slide show, can be used to convey a message, instruction, advertisement, etc to the user while the the Flash file is being loaded. Click Here for a demonstration of a slide show using a preloader including a title page. The Preloader is configured with a title page, progress bar, text and is set to fixed 100%.
Since the percentage required to preload to insure smooth play is a function of the band width of the viewers system no one value will optimize results.
Selecting the Adaptive button uses an advanced feature of ImageMatics WD products. The preload time is computed at the beginning of the Flash file download.
When Adaptive is selected it determines the user's connection speed and based on that figure and the size and display attributes of the file you are preloading, it calculates preloads the exact amount of the Flash file required to enable the video portion to begin playing as soon as it possibly and not stop or stutter at any time until it is complete.
Adaptive is the recommended setting. For small slide shows no preloading may be necessary.
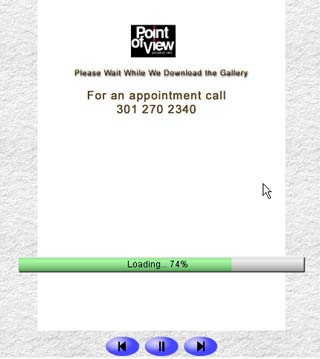
Choice of color, style and typefaces may be selected from options available on the Preloader tab. The screen shot below shows a preloader create using a Title Page (the company contac information and phone number are on the title page), Progress Bar, with text placed at the bottom. )

T he Progress Style panel shown on the right, provides the progress bar style and attributes.
The selections are:
- None: No progress bar is generated
- Text Only: The Loading percentage message is shown with no progress bar
- Smooth Bar: Both the progress bar and the progress percentage are displayed.
Click on the image for a preloader demo.
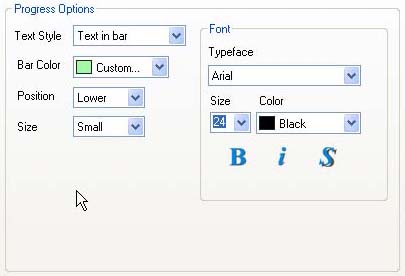
The Progress Option panel, shown below, provides control of the display attributes, position and size of the progress bar.
 The Text Style drop down menus provide four options for the preloader text percentage display:
- None: No text is displayed
- Text above bar: The text os placed outside and above the progress bar
- In the Bar: The text is placed in the progress bar (as in the figure above)
- Text below the bar. The text is displayed outside and below the progress bar.
The Bar Color pull down menu is used to select the color of the progress bar from a list of preset colors. A Custom option selects a standard Windows color editor for the creation of a custom progress bar color.
The Position drop down menu provides five choices for where the progress bar will appear. they are:
- Top - The very top
- Upper - Upper third
- Middle - Vertical center
- Lower - Lower third
- Bottom - very bottom
The Size drop down menu provides three choices. they are small, medium and large.
The Font panel controls properties and the alignment of the type face.
The Typeface Drop-Down menu provides a list of all True Type fonts available on the PC. You should expect to see dozens of selections when this Drop-Down menu is selected. These fonts are provided with your Windows operating system.
To select a desired typeface click on the Typeface Drop-Down menu and then click on the type face you wish to use. As soon as a typeface is selected all the text in the slide is changed. The Text Drop-Down menu provides a selection of standard typeface sizes. Click on a size selects it and causes all the text to be changed to that size. The typeface size may also be typed into the Text box and may be an size up 99 points.
The Color Drop-Down menu selects the text color from a standard list. The last value, Custom provides access to a standard color selection dialog that provides for creation and saving and selection of any of the available 16+ million colors supported by 24 bit images.
Standard Bold, Italics and Drop Shadow buttons the choices which are applied to all the text on the slide. The Drop Shadow creates an anti-aliased (blended) outline that adds visibility to the text over complex backgrounds. This is highly recommended for video output.

