Edit Tab
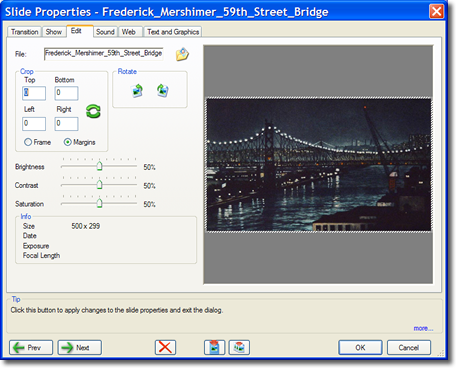
The Edit dialog provides basic editing control over the image appearance. Controls are provided for image rotation, cropping, britness contrast and saturation The illustration below shows a the Edit Property tab.

Edit Tab
The File text box contains the location of the image. Changing the image path will substitute a new image and maintain all the properties associated with it. A standard browse dialog is provided to find a new image or a new location of the current image.
Cropping Tool
 The selected slide is shown surrounded by an Area Selection Box with six "handles" shown as blue dots. Holding the cursor over a dot and then holding down the right button and moving the mouse will resize the Area Selection Box, providing the desired cropping of the image.
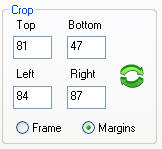
The Top, Bottom, Left and Right text boxes in the Crop panel indicate the corners of the Area Selection Box. This values may also be manually set.
The selected area of the image is when completed the selected area of the image is cropped to the contents of the Area Selection Box and then resized to full the slide frame. This process may be undone by selecting the Undo on the Edit menu on the main task bar.
The green button to the right of the Crop Position Indicators will reset the Area Selection Box to the full image when clicked. The Crop Position Indicators all show pixel values.
The Crop tool provides two manual ways of cropping an image. These are the Margin and Frame methods which are selected by the button below the Crop Position Indicators.
When Margin is selected exact cropping margins may be typed directly into the Crop Position Indicators which now show margin width. The full image initially has no margins so all values are set to zero. The Margin method is used when a known amount of border is desired to be removed from each side of the image.
The Frame method utilizes the absolute coordinates of the image. Moving the Area Selection Box causes the values of the Crop Position Indicators to change as it is moved. Cropping may be accomplished in using either method or by interactively adjusting the Area Selection Box.
Rotation Tool
 Below the Crop tool area are two curving arrows over miniature slides. These arrows will rotate the selected image 90 degrees in the direction indicated by the arrow. This function is especially useful when dealing with images input directly from a digital camera medium which may be in both vertical and horizontal rotations depending how the camera was held when the images where acquired.
Level Controls

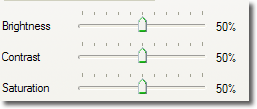
The level control sliders interactively control the brightness, contrast and saturation of the image. Adjusting the saturation to 0% will convert all images to black and white. This can be used to create interesting effects.
The Info panel contains information about the image.
The image size is shown for all images. If the image was created with a digital camera using standard field tags the date the image was taken, the exposure and the focal length of the lens will also be shown. All of these values are acessable as parameters

