This tutorial describes the creation of the Eagle
Movie which may be viewed by clicking on its Icon.
The photography and show production where done by Russell
Pickering, a well known nature photographer and photo guide. He is also
the the author of this tutorial.
Photographic and Location Information
These images were shot on the North Fork of
the Shoshone River in the Shoshone National Forest about 27 miles east of
the east gate of Yellowstone National Park. The carcass in the river was a
ram or mountain sheep. That series represents approximately 50 hours of
sitting in the bushes over 7 days. The eagles would make one or two
runs a day at unpredictable times. I actually had to leave my truck 3
miles away and be in the blind by sunrise to get in undetected. Their
vision is 4x better than 20/20 and they monitor prey for hours before
committing to a feeding. There were entire days where they never showed at
all after 9 hours of sitting.
It was shot with a Canon 10D in RAW mode. I
used a Canon 75-300 Image stabilized lens with the series being shot on
the 300mm end of that. It was entirely on a tripod. The frame rate for the
series shots was 3fps for a burst of 9 shots.
Creating
the Show in ImageMatics PE
The first
step is to prepare a project folder for the show to keep things
organized. I usually put all of the show images into an image folder
within the project folder. With PE you can insert images from
any location on your computer if you wish to add to the show as you go.
The ImageMatics
PE program also
automatically resizes and formats the images for you. I recommend using
images that all have the same aspect ratio. This will ensure edge-to-edge
coverage in the final output. If you show the movie with a different
aspect the ratio then that or your images you’ll have border space
around your displayed movie. Setting the Movie Background color
to the background color of your web page or player alleviates this
consideration.
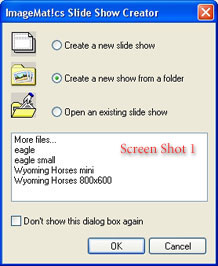
When you open PE it will
present you with a Quick-Start screen as shown in Screen
Shot 1. Select
the ‘Create a new show from a folder’ option and direct the program to your
image folder.
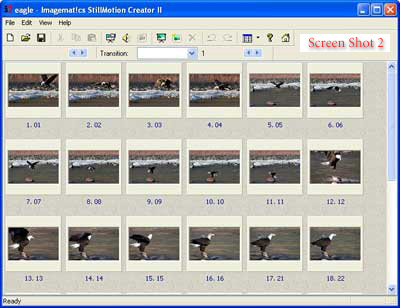
This creates an instant
show. Screen Shot 2
is what you will then see in PE's Slide Sorter View. PE's slide
sorter interface lets you drag photos into the order you want them to
play as well as delete, copy and paste.
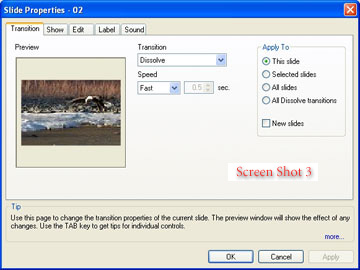
If you double-click on a
slide, you’ll have options for customizing the parameters of that slide in a
variety of ways as in Screen Shot 3.
Selecting the Transition
tab lets you customize your transition
type and display time. The Show
tab controls how long the slide is displayed and whether you want it to be
still or pan/zoom.
The
Edit tab lets you crop,
resize and adjust the brightness and contrast of individual slides. The
Label
tab supports annotation and text overlay into the slide.
The
Sound (Slide Sound) tab let you add
sound to individual slides such as the eagle screech at the end of
show. Additionally, narration can be added that automatically
synchronizes the slide duration to the sound byte.
PE’s interface allows
extensive creative control on individual slides as well as the entire slide
show.
To create the
animated “claymation”
effects on the eagle flying and landing I used extremely short times on the
transitions which are controllable to a tenth of a second if desired.
To create animated
sequences as I have done here your camera should be
securely mounted on a tripod.
The other effects where
created by experimenting with timing and transition selection. I strove to
keep the visual action in synchronicity with my selected background
background music which added drama to the captured visual event..
PE
can use .wav and .mp3 in either mono or stereo. You can control the file
size by choosing the music compression within the program. I used the
default of medium size and quality in this show.
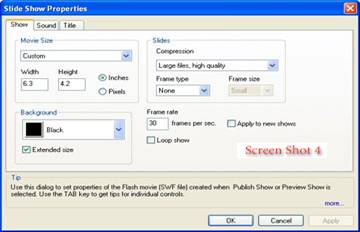
The
Slide Show Properties window in
Screen Shot 4
is where you set properties that affect the entire show rather than
individual slides. You can set the image size and quality as well as other
display features. The Sound
and Title
tabs are self explanatory.
For this show, I relied on the default
compression, frame rate and background settings. I did choose a custom movie
size to ensure a match with my image's aspect ratio for edge-to-edge
coverage.
Remembering to save my work as I created
the slide show was one of the is one message I want to convey in this
tutorial. I used Save As
under the
File Menu
to create different stages of my show as it progressed.
Once
I was satisfied with my slide show the final step is to publish the show in
the format and media you desire.
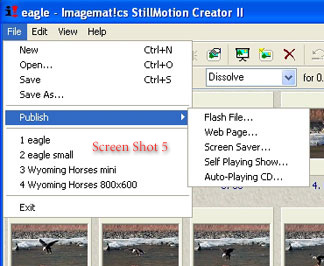
The
Publish
selection shown in Screen Shot 5
shows you your publishing options.
For the purposes of our
show, we’ll save it as a Flash File (SWF) which I can now add to an exiting
web page.
My
Eagle show is now complete.
Visit the
Photo Safari America
Web Site for more great nature and
outdoor photography.